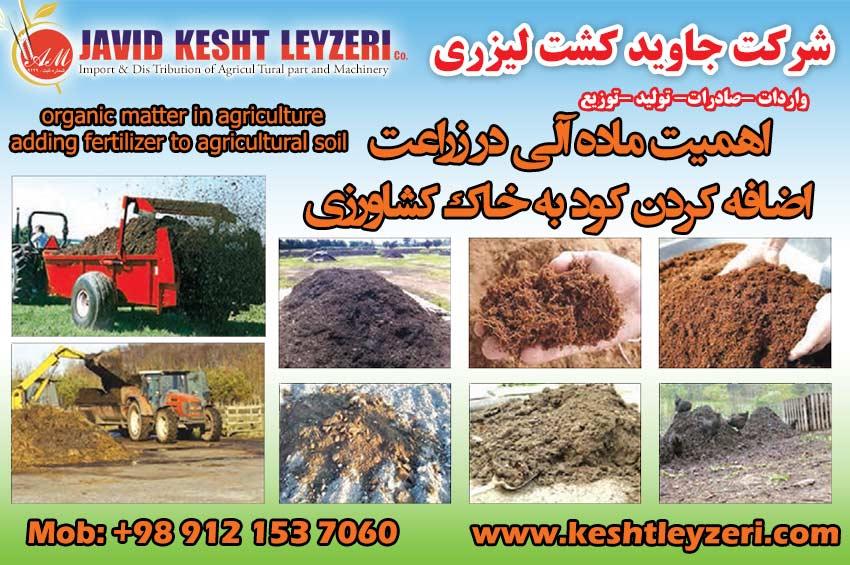
The importance of organic matter in agriculture and adding fertilizer to agricultural soil
javid keshtleyzeri Co.ltd
The importance of organic matter in agriculture
According to the definition, any substance that has carbon in its molecules and originates from a living organism is called an organic substance. Organic materials act as binding materials for soil particles and the structure of soil grains, and the more it is, the better. In soils with a lot of organic matter, the soil grains are more stable and resist compression and stress to the soil more. Some crops, such as potatoes, fodder corn, and small grains, leave little residue after harvesting and as a result, add little organic matter to the soil. They help to increase the organic matter of the soil, provide plant nutrients and strengthen the soil.
When organic materials enter the soil, they go through two paths. In other words, they have two different fates:
1- They may be completely decomposed. In this case, they become their primary constituents. Therefore, they can provide part of the nutritional needs of plants. If the amount of organic matter is high, most of the plants' nutritional needs are met in the same way.
2- Some of the organic materials introduced into the soil are incompletely decomposed. These materials turn into tiny black particles with complex chemical compounds called humus. Humus plays an important role in the soil. It keeps nutrients on the surface of the soil and gradually enters the soil solution. Humus, like clay colloids, causes soil particles to stick together, forming and stabilizing soil grains.
If farmers realized the importance of organic matter, they would not be willing to burn the straw. Organic materials, while improving and stabilizing the soil structure, also improve the moisture, thermal and ventilation conditions of the soil.
The higher the organic matter in the soil, the higher the fertility of the soil. Unfortunately, the amount of organic matter in most of the soils of our country is very low and often below 0.5%. While good soils, following the principles of sustainable agriculture, have more than 3% organic matter.
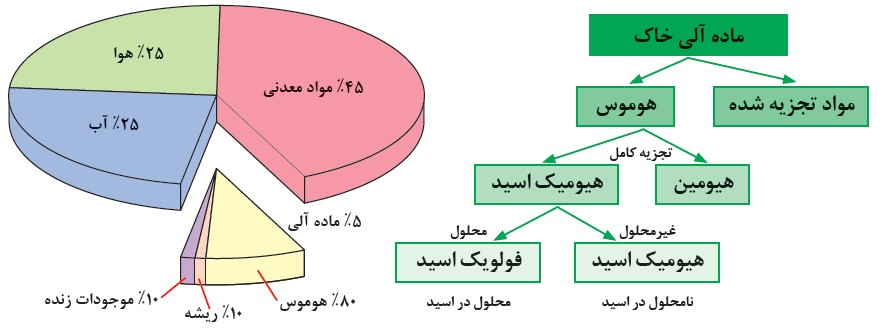
The process of forming humus, the role of humus
Add organic fertilizer to the soil
Organic fertilizers are generally divided into animal and plant groups. Animal fertilizers in our country mainly include cow manure, sheep manure and chicken manure, which can be used in farms and gardens after processing. Although the wastes of all animals are valuable as fertilizers, their consumption is limited in our country.

Poultry, cattle and sheep breeding
Planting some plants and subsoil them at the right time (green manure), the remains of the previous crop, leaf soil, urban compost (processed garbage), vermicompost, etc. are examples of organic fertilizers.

Urban compost, cocopeat, peat
Adding manure to the farm soil
Required tools, equipment and materials: tractor, manure spreader, trailer, shovel, suitable work clothes, personal safety equipment, processed manure
Part 1 - Add manure using a manure spreader
Steps to do the work:
1. Get ready for work (wearing appropriate work clothes, carrying safety equipment, organizing group work, etc.).
2. Enter the agricultural machinery storage area.
3. Take over the tractor and make it ready for work (inspection, supply of materials and fixing possible defects).
4. Connect the manure spreader to the tractor
5. Check the health of the building and the correct operation of the manure spreader (tires, body, connections, power transmission system, connection and start-up axis)
6. Drive the tractor and trailer to the processed manure storage area. (It is emphasized that all routes outside the farm are performed by a tractor driver with a valid license.)
7. Pour the manure into the manure spreader as a group. If the educational unit has a loader or an excavator tractor, you can use this device with prior arrangement.
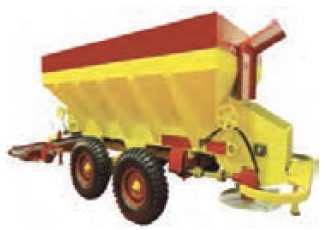
Fertilizer spreader
Note: When loading manure into the fertilizer tank behind the tractor, observe the following:
Be sure to use a mouth mask and gloves.
Keep a safe distance from each other.
If loading is done from both sides of the tank, be careful of the people on the other side.
8. After filling the tank, make its surface firm and stable by hitting the back of the shovel.
9. The tractor carrying the manure spreader full of manure should be directed to the farm.
10. Before starting the work, agree on the turn of the group members and the scope of each one's activity.
11. Start fertilizing.

Spraying manure with a manure spreader
12. After a short advance, stop and check the settings:
Measure the width of the spray and determine your return path based on that.
Measure the amount of spray and adjust your speed accordingly.
It is suitable to spray to create a layer of thickness of 7-6 mm on the surface of the soil uniformly.
If we consider the specific weight of rotten manure to be about 0.6 grams per cubic centimeter, a thickness of 6-7 millimeters in diameter on the soil surface is equivalent to several kilograms per square meter or several tons of manure per hectare.
13. Continue with the settings.
Make sure that there is a good overlap between the rows.
14. When the fertilizer tank is finished, repeat the operation of loading and transferring the fertilizer.
pay attention:
Always adhere to ethical principles and follow safety and health tips carefully.
Never ride a manure spreader.
15. At the end of the work:
Confirm the quantity and quality of your operations. Without the student's approval, the work is not considered finished.
Deliver tools, equipment and machines clean and tidy.
Clean up your environment. There is no residue left in the field.
Do personal hygiene.
Complete the operation report and record your criticisms and suggestions.
Part 2 - Adding manure to the farm soil with a trailer behind a tractor
Steps to do the work:
Steps to do the work:
1. Do steps 1-9 as in the first part. Obviously, at this stage, instead of the manure spreader, the trailer will be behind the tractor.
2. If the trailer has protection on both sides and the front at least one meter high, 2 people should ride the trailer. At the same time as the tractor moves forward, these two people use a shovel to harvest manure and sprinkle it on the ground.
Pay attention: with a little progress, you should check the settings. Its purpose is to place a layer of manure 6-7 mm thick on the ground. According to this goal, the speed of progress and the speed of people's work should be adjusted.
3. If the trailer does not have a guard, empty the fertilizer inside the tank at one or more points (depending on the trailer tank).
4. In the same way, carry out unloading and loading on the entire surface area of the group.
5. Spread the accumulated fertilizers on the field.
Note, stop working when the wind blows. In any case, take care of yourself and others.
6. At the end of the work:
Check the quantity and quality of your work.
Clean your tools and deliver them.
Clean up the environment.
Observe personal hygiene and hygiene.
Complete the operation report.
Manure processing:
As mentioned, animal excreta can be used when they are treated and so-called decomposed. Using fresh manure on the ground is not only not useful but also harmful. Because while increasing harmful factors such as weeds and some parasites, it increases the cost of production. To process animal manure, proceed as follows:
Required tools, equipment and materials: fresh animal manure, suitable work clothes, personal safety and hygiene equipment, shovel, ferghun, hose, normal water, plastic boots, meter, ingot, leveler, construction thread, greenhouse nylon (of normal types)
Steps to do the work:
1. Get ready for work.
2. Consider a place for manure processing.
Note: To determine the place of manure processing, pay attention to the following:
1-2. The place is relatively flat or has a very gentle slope.
2-2. It should be far away from the water and other water sources and residential areas.
2-3. Be close to the place of production (livestock) or to the place of consumption, the farm.
2-4. The shape of the land is better to be rectangular. But square and circular fields are also acceptable.
2-5. The area of the manure processing area should be about one thousandth of the area of agricultural land that is fertilized annually.
2-6. Consider the annual fertilization area as a quarter of the total area of your land. So that you can repeat the fertilization of all parts every 4 years.
If the amount of manure used is 40 tons per hectare, the specific weight of fresh manure is 800 kg/m3, and the height of the manure pile is 2 meters, determine the area of land required for manure processing.
3. Prepare the processing area.
3-1. Make the floor as flat as possible.
3-2. Make the floor slope gently (about 1%) from the center to the surroundings or from one side to the other.
3. Make the floor as impenetrable as possible.
3-4. At the end of the slope, create a narrow stream called a drainage stream.
3-5. At a distance of 1-2 meters from the end of the drainage ditch, create a well with a depth and diameter of 70-80 cm. The well must be completely impermeable. For example, you can embed a plastic barrel to collect the leachate from the accumulated manure. Install a pipe between the end of the drainage ditch and the leachate well with a suitable slope.
It is possible to permanently create a manure processing area with building materials. In this method, three sides of the place are walled up to a height of about 2 meters and the floor is completely isolated. The garbage collection and guidance system is installed in its floor. Usually, this place is made in two parts. One part is used for processing and the other part is used for storage during the processing of the first part.
4. Pile fresh animal manure in the prepared place in the following order.
During this operation, in addition to plastic gloves and mouth mask, it is necessary to wear long plastic boots.
4-1. Pour and spread fresh manure on the surface with a plow or any other suitable device.
4-2. If the fertilizer is dry for any reason, moisten it by sprinkling or sprinkling water, and if it is too watery, balance it by adding dry plant materials (straw and stubble).
4-3. When the thickness of the fertilizer layer reaches about 30 cm, compact it with a roller or a heavy object such as rolling a barrel filled with water. If you don't have any kind of equipment, kick it.
4-4. Continue stacking, wetting and compacting until the site is full.
4-5. If you run out of fresh manure before the capacity of the place is full, stop the work by pulling a nylon line over the pile and restraining it.
4-6. As fresh manure is available, continue piling, wetting and compacting while removing the nylon from the pile.
Note that this arrangement increases the temperature inside the mass and destroys all parasites and most weed seeds and harmful factors including pests and diseases.
Use water to the extent of moisturizing. Avoid soaking the mass separately.
Filling the capacity of the place may be done in one or more times. It is better that the duration of accumulation is not more than 2 months.
4-7. When the capacity is complete, compress the mass as much as possible. Firm the area around the pile with the back of the shovel and give it a dome shape.
4-8. Pour a few centimeters layer of soft soil on the pile and cover the pile completely. For the stability of this layer, you can moisten it by spraying water.
4-9. Spread the nylon over the pile. Firmly cover the top of the nylon and around it with soft soil or by placing a worn car tire. Act in such a way that the prevailing wind in the area cannot move the nylon cover.
4-10. Create a ridge around the pile so that no rain or snow water can enter the pile.
Managing the manure processing process
Required tools and equipment: shovel, four horns, suitable work clothes, plastic boots, personal hygiene and safety equipment, soil thermometer
Steps to do the work:
1. Get ready for work.
2. About 2 months after piling, enter the piling place.
3. Remove the covers on the pile regularly. Be careful not to tear the nylon.
4. By dipping a soil thermometer inside the pile, measure the temperature of at least 5 points of the pile. Record the temperatures in a notebook.
5. Start turning the pile from one side, that is, 2 people should stand on one side of the pile facing each other and turn the pile completely with a shovel or four horns.
Make sure that the entire mass is turned from bottom to top and from beginning to end. While working, be sure to use plastic boots, mouth mask, plastic gloves.
6. Take turns doing the work so that everyone has worked in roughly equal proportions.
7. When the entire mass has moved from its initial position, return the mass to its original position again. At this stage, perform the gradual accumulation, moistening and compression operations as in the first time.
8. At the end of the piling operation, shape the pile, strengthen the surrounding and cover it as in the first time, and organize around that pile.
9. Repeat this operation at least 2 more times to obtain processed fertilizer.
10. At the end of the work:
Get the quality and quantity of your work approved by the student.
Clean your tools and deliver them.
Clean up the environment.
Observe personal hygiene and hygiene.
Complete the operation report.

